This specific use case is a simple example of how we can capture JSON sent from Drupal and use Power Automate to perform an arbitrary task with said data. Other use cases might include things like automatically creating records in Microsoft's Dynamics 365 CRM, appending new rows to an existing Excel file, or sending an email to specific users if a specific condition is met.
This Power Automate and Drupal integration example is split into two parts: 1. Creating the Microsoft Power Automate Flow and 2. Setting up the Drupal Webform. The Power Automate Flow will accept a JSON payload and perform an action with the data it receives. The Drupal Webform will submit its data to the Flow.
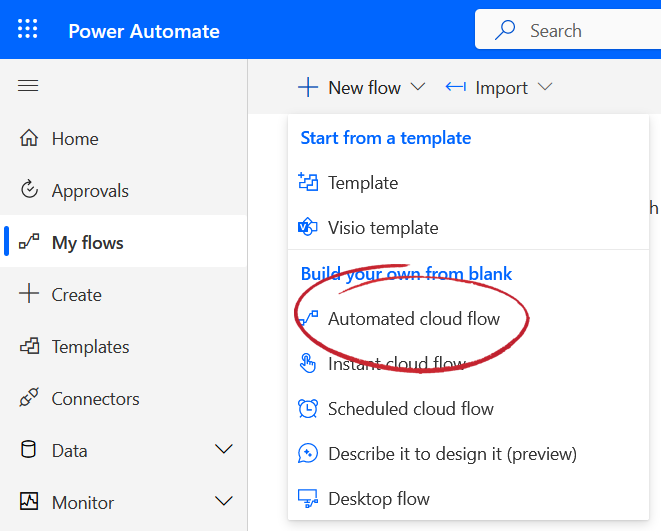
Creating the Microsoft Power Automate Flow
We begin by creating a new Automated Cloud Flow.
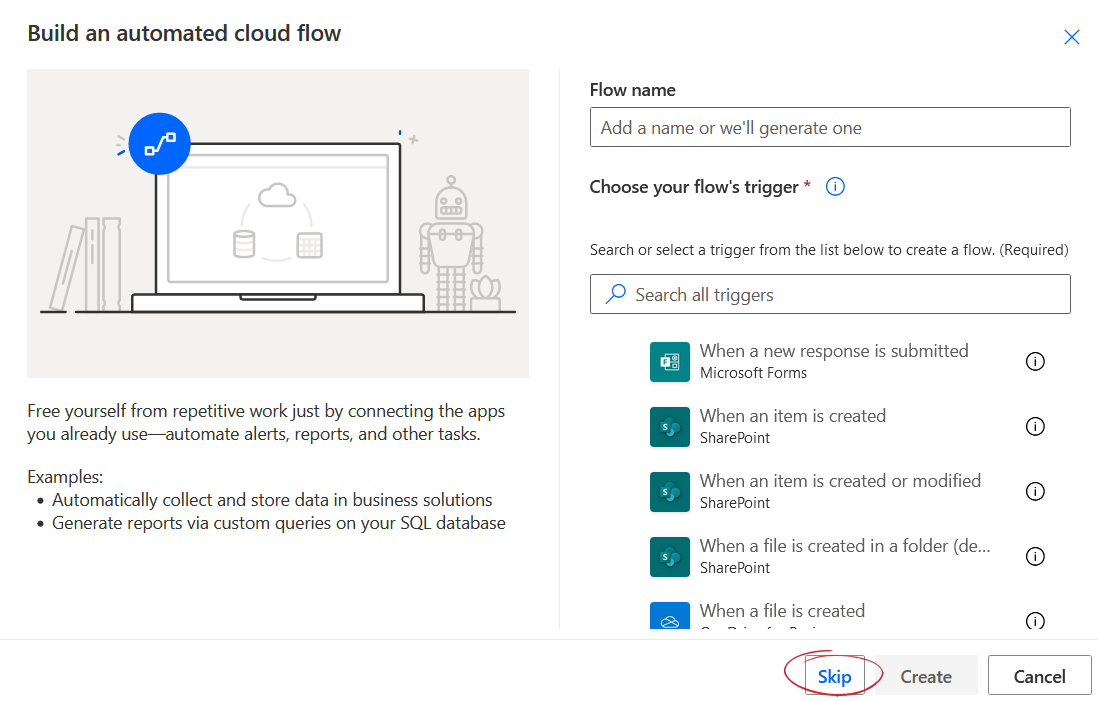
When prompted to choose your flow name and trigger, click Skip.
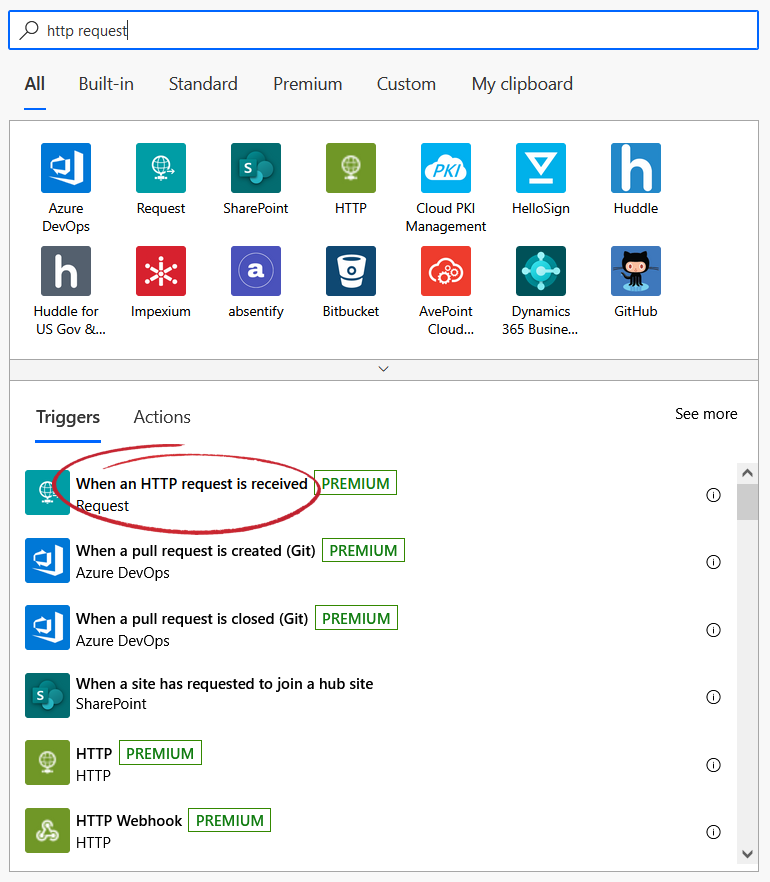
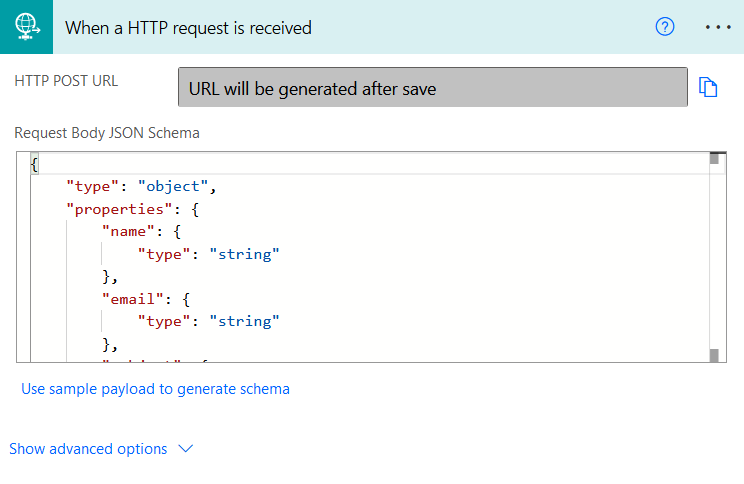
The trigger is going to be "When a HTTP request is received" as we will be receiving a JSON payload from the Drupal Webform. You can find this trigger by searching either "http request" or "when a http request is received".
After adding the HTTP request trigger, we need to setup the Request Body JSON Schema so that our response can be parsed. An easy way to setup this schema is to use the "Use sample payload to generate schema" tool. By default, the Drupal Webform JSON response is very simple, in our case we will be using the default Contact Us form which only exports a few fields.
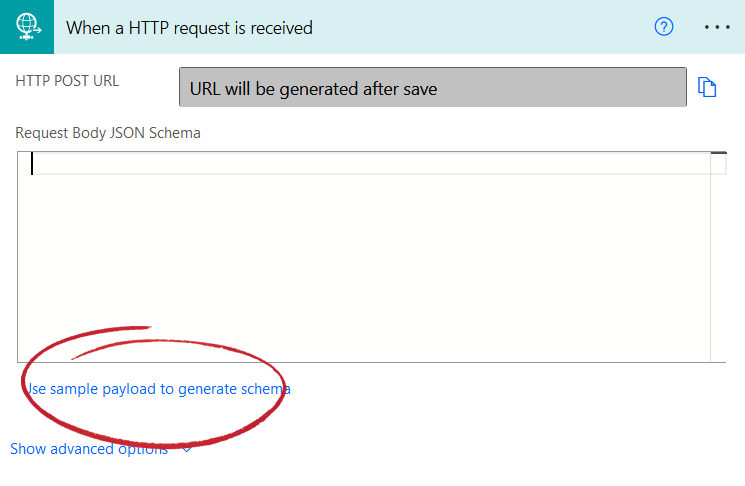
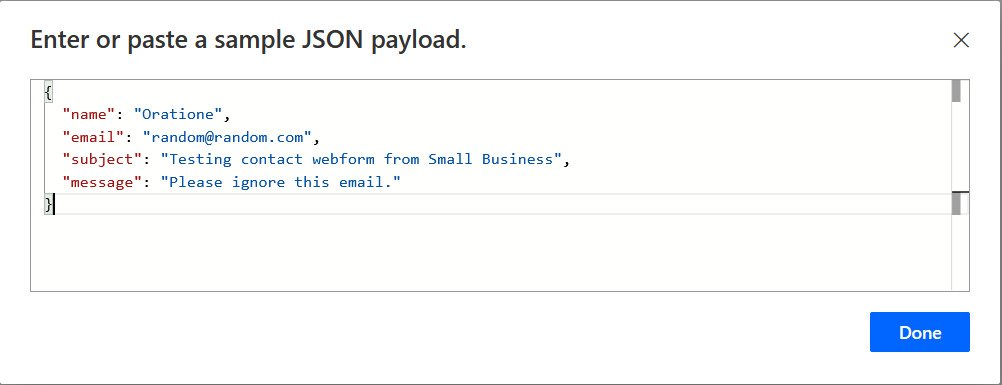
The JSON below is an example of what the Contact Us Webform would produce. You can copy and paste this into the sample payload form to generate the required schema and click Done.
{
  "name": "John Smith",
  "email": "johnsmith@example.com",
  "subject": "Testing contact webform.",
  "message": "Please ignore this email."
}
You should now see a schema similar to this:
At this point in the flow, we are setup to receive a JSON payload and can do nearly anything we want with it. In this example, we will be using our payload to generate a new Microsoft Teams message that a user will receive any time our Drupal Contact Us Webform is submitted.
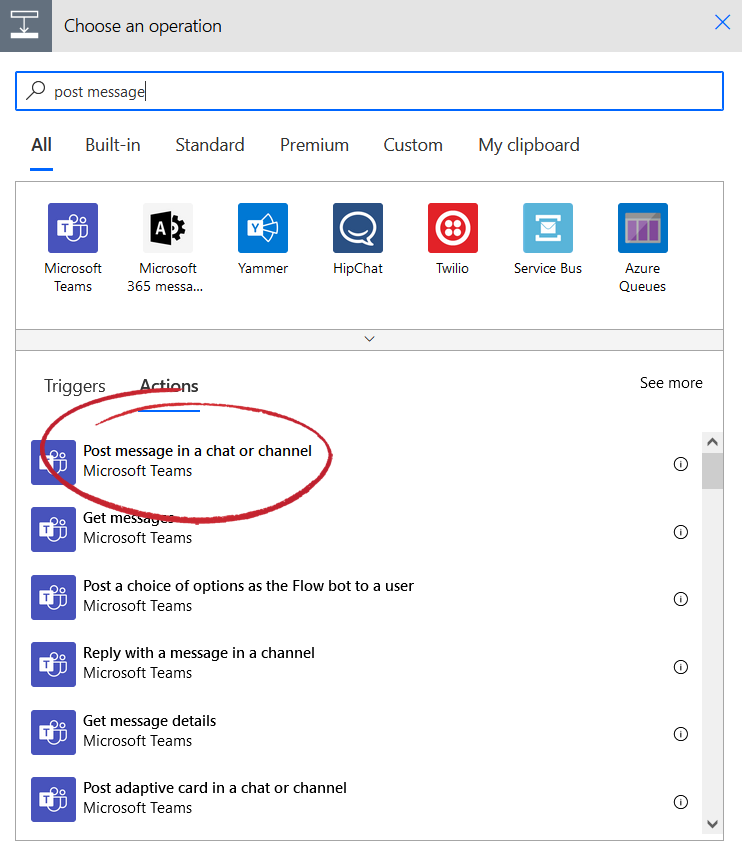
We will now insert a new step in the flow and search for "Post message in a chat or channel".
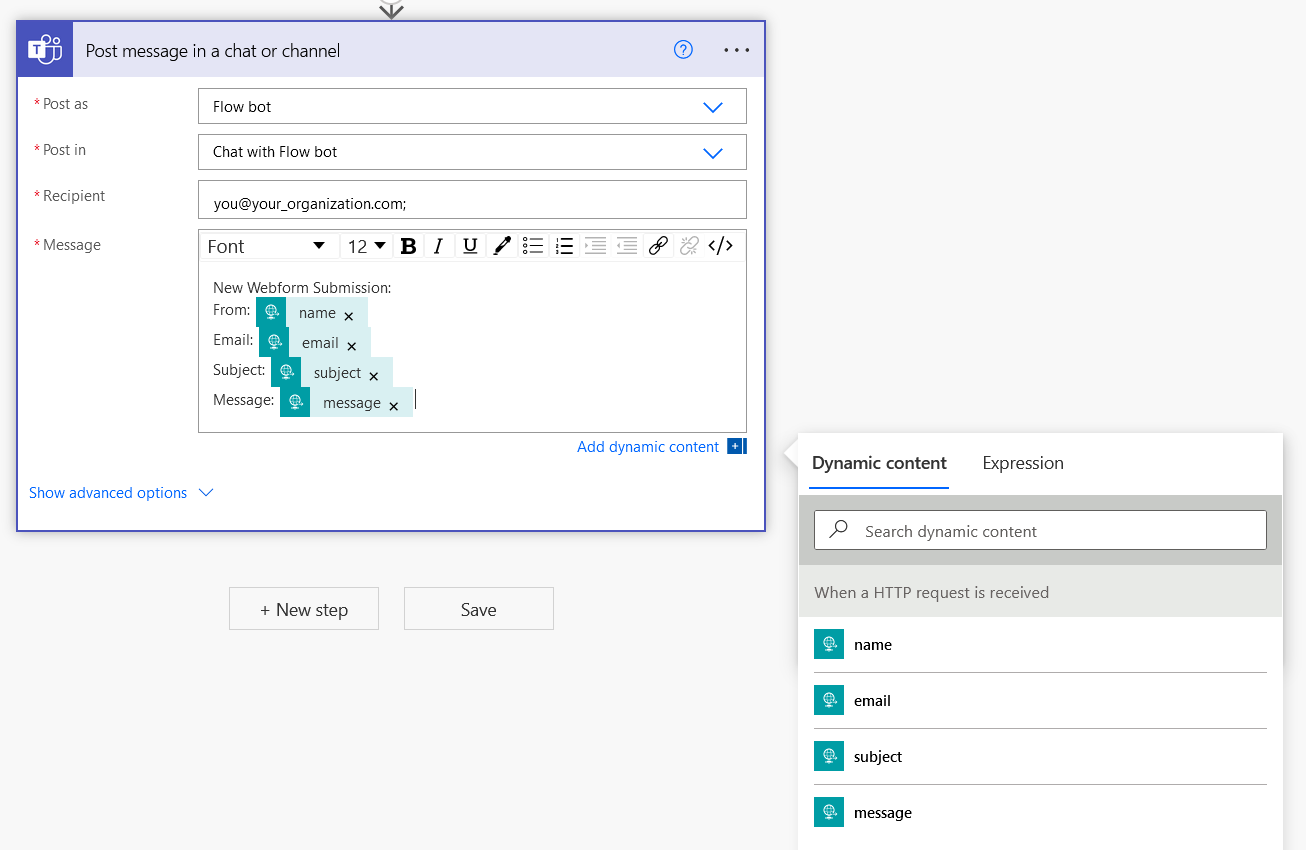
After adding the "Post message in a chat or channel" operation, you will need to setup how you would like this operation to behave. Here we choose who the message is sent from, where to post, who should receive it, and how the message should be formatted. As you type in a recipient (someone in our organization in this case), you should receive an autocomplete prompt for that user.
In the message portion, you can choose from Dynamic Content which has automatically parsed the fields expected from our JSON payload. You can click on any of these fields to automatically insert them into the body of your message. This is one of the best parts of using Power Automate, you aren't required to do any extra processing here for basic text data. You can however further process these fields by using the expressions tab. You can read more about using expressions in the official Power Automate documentation here: https://powerautomate.microsoft.com/en-us/blog/use-expressions-in-actions/
Now we are ready to save and generate the HTTP Post URL for our Flow. Click "Save" at the bottom of the Flow and now in the top trigger, you should see the HTTP Post URL field populated. It should look similar to the image below. We will use this URL in the next step when we setup our Drupal Webform.

Setting up the Drupal Webform
To setup the webform to send submissions as JSON to our Flow, begin by editing your desired webform and navigating to Settings and then Emails/Handlers. Click "Add handler".

Choose "Remote Post" for the new handler.

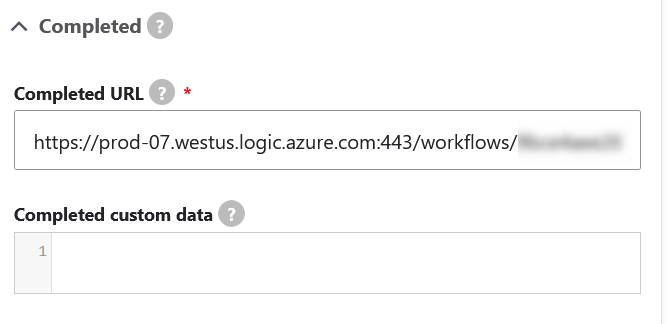
In the Remote Post configuration, all we need to do is enter the "Completed URL" and set the "Post Type" to JSON. The Complete URL field needs to use the HTTP Post URL generated from our Flow. Your setup should look similar to this after pasting in the URL:
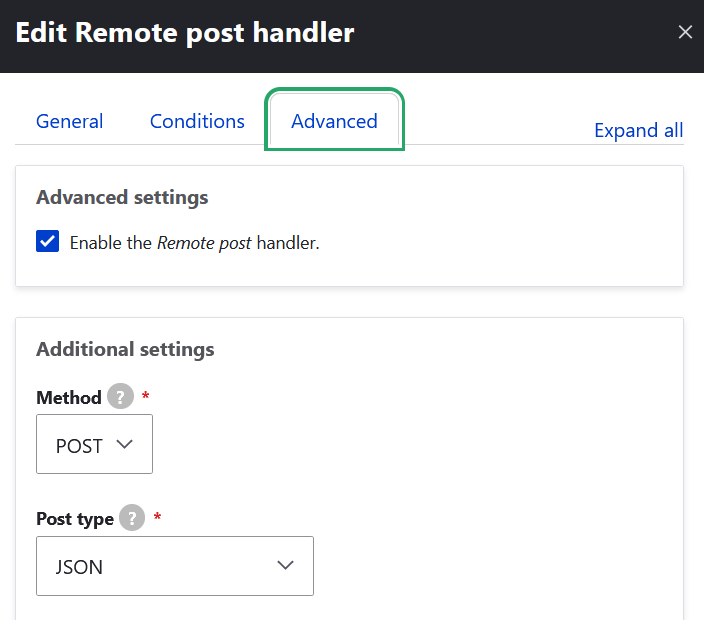
Under the Advanced tab you will find an area for Additional Settings. Set the Method to POST and Post Type to JSON. Your settings should match the image below.
Save the changes made to this handler and then we are ready to test.
Note: For this demonstration we are using the pre-existing Contact Us form that is created when Webforms is installed. By default, this webform only has the following fields: name, email, subject, and message. These four fields are what will be submitted as JSON to our Flow. You can add or subtract as many fields as you want but you will have to update the Request Body JSON Schema for the data to be received by the flow.
Now we are ready to test. Visit your Drupal Webform, fill out the form, and submit. You (or whichever recipient you chose) should receive a new Teams message with the form submission data.

Conclusion
This is a simple example of how to send a request from Drupal to be received by Power Automate and perform an automated operation. Drupal Webform was used here as a simple way of performing the required HTTP request to Power Automate. The real power of this example is in showing how simple it is to setup the HTTP endpoint with our Flow. This endpoint can be used in custom Drupal modules (via curl/http request) to execute on any arbitrary operation.